|
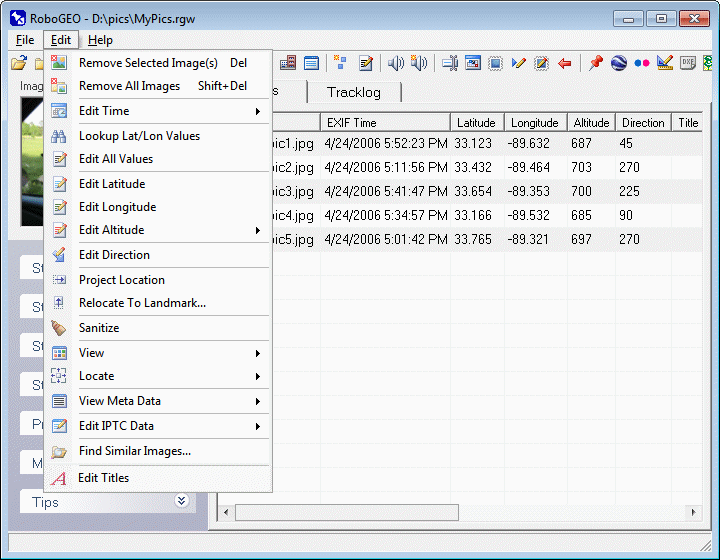
To edit an image's latitude, longitude, altitude, direction, or title either type the new information directly into the grid, use the Google Earth Geocoder, or select the image(s) and then use the various options under the 'Edit' pull-down menu. You can only edit the EXIF time using the pull-down menu. If multiple images are selected, the new values that you enter are applied to each.
To select a single image, double click on either the 'Image' or 'EXIF Time' columns. To select multiple images, click on each while holding down the Ctrl key. To select all images, press Ctrl-A. Once one or more images are selected, you can act on them either by directly selecting the 'Edit' pull-down menu or by right clicking in the grid.
Double clicking on the latitude, longitude, altitude, direction or title cells allows you to edit the cell value in-place. You can also simply begin typing when the cell is highlighted. Press the <enter> key to save the new value.
To remove one or more images from the list, select them and then press the Del key. To remove all images, press Shift-Del.
To copy the grid data to the clipboard, multi-select the rows that you want to copy and then press Ctrl-C. The resulting tab-delimited data can then be pasted directly into Excel or other 3rd party program.
Columns can be sorted by clicking on the column headers. Reverse the sort order by clicking a 2nd time.
You can embed a copyright notice or the name of the artist in the EXIF headers from the preferences area.
This option removes the selected image(s) from the list. It does not delete anything from the disk. You may want to do this if, after geocoding, you find that a specific image was not geocoded. You can also accomplish this by selecting the image(s) and then pressing the Del key.
This option removes all of the selected images, waypoint data, and any associated audio files that may be currently loaded. If tracklog data exists, you'll be prompted whether to remove it too. Removing all of the data is equivalent to restarting the program. You can also accomplish this by pressing Shift-Del.
This option allows you to lookup latitude and longitude values using an on-line Google Map. Alternatively, you can use the Google Earth Geocoder.
Upon selecting, http://www.robogeo.com/latlonfinder/map.asp will load into your web browser. You can control the default view by setting the LatLonFinderUrlQueryString option.
This webpage simply displays the latitude and longitude for points on a map. It's intended for use in conjunction with the 'Edit All Values' option when you're manually georeferencing images.
Doubleclick on the map to recenter it. Press/hold your left mouse button, then drag, to pan the map. Click the slider control on the left hand side to zoom. Click the buttons in the upper right corner to change the view. Note the crosshair at the map's center and how the displayed coordinates changes as it moves.
Here's the routine for looking up and specifying lat/lon values using the on-line map:
1. Select the 'Lookup Lat/Lon Values' option under the 'Edit' pull down menu.
2. Wait for the LatLonFinder website to load.
3. Double click and/or zoom the map to your desired location.
4. Copy the red lat;lon line to the Windows clipboard.
5. Back in RoboGEO, double click on the desired image.
6. Select 'Edit All Values' from the resulting pop-up menu.
7. Paste the latitude and longitude into the box when prompted.
8. Optionally, include the altitude at the end of the pasted text.
9. Select 'OK'.
Repeat steps 3 thru 9 for each image that you need to manually georeference.
If the image you're working with (step #5) isn't currently georeferenced and if a valid lat;lon pair exists on the Windows clipboard (step #4), the lat;lon pair will be the default value and there will be no need to paste the coordinates (step #7). Just click the 'OK' button. This allows you to manually georeference images very quickly.
This option is only available if you've selected DEGREES (which is the default) for the default coordinate format.
Instead of manually entering the latitude, longitude, and altitude individually, you can enter all 3 at once by selecting this option.
The input must be of the form:
Latitude;Longitude[;Altitude]
Note that's the latitude, followed by a semi-colon, followed by the longitude. The last semi-colon and altitude are optional.
The decimal separator in the values can either be a period or what's defined in the Windows Regional Settings for your locale.
Here are some valid examples:
32.72372;-95.632532;1120
34.29299292929;-91.838383
36;-92
34,29299292929;-91,838383 (valid where commas are used for decimal points)
Here are some invalid examples:
-95.632532;32.72372;1120 (latitude is out of range)
34.29299292929:-91.838383 (must use a semi-colon delimiter, not a colon)
34.29299292929,-91.838383 (must use a semi-colon delimiter, not a comma)
34.29299292929-91.838383 (missing semi-colon)
36N;92E (values must be numeric)
36-22-43;-91 12'-33" (lat/lon values must be decimal degrees)
This option is intended to be used in conjunction with the 'Lookup Lat/Lon Values' option described above.
This option is only available if you've selected DEGREES (which is the default) for the default coordinate format.
Manually enter the latitude of the selected image. Normally, latitude information is automatically obtained when you geocode the images, so you'll probably never need to use this option.
The latitude must be between -90 and +90, entered as decimal degrees. The decimal character must be as defined in the Windows Regional settings for your locale, i.e. if your locale is 'Finnish', which uses a comma for a decimal point, a value of 55.12345 would be invalid.
Areas north of the equator are positive, south of that are negative.
If you need to convert DD-MM-SS (degrees, minutes and seconds) to decimal degrees, use the following method:
1. Convert the seconds component to minutes by dividing it by 60.
2. Add the result of #1 to the minutes.
3. Convert the new minutes to degrees by dividing it by 60.
4. Add the result of #3 to the degrees.
For example, 39-20'-15'' = 39-20.25' = 39.3375 degrees.
If you're converting from DD-MM.MMMM (degrees and decimal minutes) to decimal degrees, do steps #2 and #3 above.
A good way to obtain the latitude and longitude for a specific street address is to use the Test Drive feature at GEOCODE.COM.
This option is only available if you've selected DEGREES (which is the default) for the default coordinate format.
Manually enter the longitude of the selected image.
The longitude must be between -180 and +180, entered as decimal degrees. The decimal character must be as defined in the Windows Regional settings for your locale, i.e. if your locale is 'English (United States)', which uses a period for a decimal point, a value of 32,12345 would be invalid.
Areas east of Greenwich England are positive, west of that are negative.
See the info about entering latitudes above for more information.
This option is only available if you've selected MGRS for the default coordinate format.
Manually enter the MGRS coordinate of the selected image. Spaces, if they exist, are ignored. Your input should normally be with 1m precision and look similar to 16SEE5009852124. Lower precisions are also supported.
There are 2 input methods for editing image directions. The first method is to use the 'Edit Direction' pull-down menu option. That will give you access to a user-interface where you can specify the various options (the actual direction, whether the direction is relative to the tracklog heading, whether it's relative to the image's current direction, to a specific location, or to the location of the nearest landmark). The second method is to type the directions directly into the grid. The details of doing that are described below:
The abbreviations (N, NNE, NE, etc.) and (F, FFR, FR, etc.) apply to both input methods:
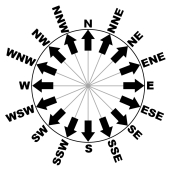 
Directions are measured clockwise from true north, i.e. north is 0, northeast is 45, east is 90, southeast is 135, etc.
There are 4 ways to enter directions when typing them directly into the grid:
1. Absolute Numeric. Enter a number between 0 and 359.99.
2. Absolute Abbreviated. Enter N, NNE, NE, ENE, E, ESE, etc. Case doesn't matter. The program will automatically convert these to their numerical equivalents (N=0, NNE=22.5, NE=45, etc.).
3. Relative Numeric. Any number that you precede with an @ symbol will be considered relative to the current direction. If the image doesn't have a direction associated with it and if a tracklog is currently loaded, the heading will be computed from the tracklog and the relative direction will be added to it. If there's no tracklog or image direction, the relative direction is treated as absolute. For example, assume all you know about a photo was that it was taken out of the left window of a moving car (you know that by looking at the image preview). The relative direction is 270 degrees, so you would enter @270. If the car was traveling southeast at the time, the photo direction would be calculated to be 45 (northeast). If the picture was taken looking out the right side window, the relative direction would be @90. If looking straight ahead, it would be @0, etc.
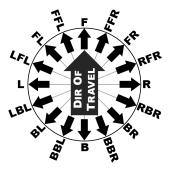
4. Relative Abbreviated. Instead of entering relative numeric directions (@90, @270, etc.), you can enter abbreviations. These are easier to remember and more intuitive. In the abbreviations 'F' is short for 'FRONT', 'R' for 'RIGHT', 'B' for 'BACK' and 'L' for LEFT. Case doesn't matter. You can also enter these in a way similar to the 16 cardinal directions (always going clock-wise), i.e. 'FFR' is 'FRONT FRONT RIGHT', 'FR' is 'FRONT RIGHT', 'FRR' is 'FRONT RIGHT RIGHT', 'R' is 'RIGHT', etc. until the last value of 'LFF' which is 'LEFT FRONT FRONT'. So, if the tracklog direction is already associated with a photo and if you see that the photo was taken looking out the right hand window, simply enter 'R' (without quotes) and the photo direction will automatically computed.
You can also determine the photo direction from the tracklogs at the time of geocoding by specifying the PhotoDirFromTracklog and PhotoDirFromTracklogOffset preferences. For example, specifying PhotoDirFromTracklog=True and PhotoDirFromTracklogOffset=270 is equivalent to manually entering @270 for all of the photo directions.
The normal work flow is to first assign the direction of movement to each photo direction. You can do that by either capturing the directions in real-time using a capable GPS unit or by making use of the PhotoDirFromTracklog option. Then, looking at the foreground of each thumbnail, determine the relative direction of each photo and enter it into the grid. Note that you can enter the same value for multiple images by multi-selecting the images (hold down the CTRL button and left-click), right-clicking, and then selecting the 'Edit Direction' option in the resulting pop-up menu.
Using the user-interface, you can set the image directions by specifying a single point. That will give each image a direction that points to the specified point. The point could be, for example, the end-point of the journey. If you have multiple photos of the same subject, like if you're photographing a building while circling it in a helicopter, all of the photos would point to the building. Specifying a single point is equivalent to loading a landmark file that has only one landmark.
You can also use the user-interface to load a landmark file to set the photo directions so that they point to the closest landmark. For example, if you're flying in an airplane and photographing a series of radio towers, you can automatically set the photo direction of each photo so that it points to the applicable (or closest) tower. You may want to do that instead of using the landmark file to relocate the photos.
This option allows you to project a photo to a new location. Perform this operation if you want the location to correspond to the photo subject instead of the GPS receiver.
Locations are always projected in the direction of the photo direction, so these must exist before you can use this option.
You'll be prompted for a distance to the new location. The units will be either feet or meters, depending on your preferences.
There are 2 ways you can specify the distance. The type of distance that you enter depends on your situation.
The 1st is 'ground mode' where both you and the subject are on the ground. Here you simply enter the distance. So, for example, if the photo's direction is 90, the AltitudeIsFeet is set to False and if you enter 1000, the photo location will be moved 1000 meters to the east.
The 2nd is 'airplane mode' where you're above the subject and the camera is pointing down to it. Here you enter your altitude AGL (not MSL), followed by a semicolon, followed by the camera angle relative to horizontal. The camera angle can vary from 0 (horizontal) to 90 (straight down). For example, if AltitudeIsFeet is set to True, you're flying in a plane 3000 feet MSL over terrain that's 1000 feet MSL and your camera is pointing almost straight down, you would enter 2000;80.
In airplane mode, projecting a location changes the altitude of the image. Since it's impossible to fly a plane at an constant elevation above the earth's surface, this can cause the new altitude values to be erroneous. By setting the RemoveImageAltitudeAfterProjecting to True, you can completely remove the new altitude values.
After you project a location in either mode, it makes the photo's direction value obsolete, so the program removes it. You can prevent this behavior and retain the directional information by setting the KeepImageDirAfterProjecting preference to True.
This option allows you to relocate photos to the location of the closest known landmark. For example, if you're in a plane taking pictures of landmarks on the ground, you may want the photo's location to reflect the actual landmark location instead of the GPS or camera's location.
The normal workflow is to first geocode the images, then to relocate them using this option, and then to process or export them.
Note, like other options under the 'Edit' pull down menu, only the currently selected photos will be processed. If you want to process all of the photos, you'll need to multi-select them first.
You can specify the maximum distance to the landmark and, if the photo has directional information, the maximum field of view. For a given photo, both criteria must be satisfied before the photo will be relocated. The maximum distance must be either feet or meters depending on the AltitudeIsFeet preference setting. If you specify 0, the maximum distance will not be considered. The field of view must be a number between 0 and 360 degrees. For example, if a photo's current direction is 45 degrees (northeast) and if you specify 100 degrees for the maximum field of view, the program will choose the closest landmark between 355 degrees (just west of north) to 95 (just south of east). Note that the angle between 355 and 95 is 100 degrees and that 45 degrees is in the center. If the photo doesn't have directional information or if your specify 0 for the maximum field of view, the field of view is ignored.
If your photos have directional information associated with them, you should normally remove the directional information after they're relocated since, presumably, the directions would no longer apply. Check the appropriate box to do that.
You must create your own landmark file and it must be in a specific XML or CSV format. Both are plain text and the numbers should use a decimal separator that's per your computer's regional settings, i.e. a comma or a period. The XML format must have an .RLM file extension and CSV format must be .CSV. The CSV format is the common quoted-comma form that most spreadsheet programs (like OpenOffice or Excel) export.
The CSV format consists of one record per line, beginning with the 1st line (there is no field definition line). Records are delimited with carriage return linefeed combinations. The fields within each record are delimited with commas. Each field value must be in quotes. The field order must be latitude, longitude, altitude, title, followed by description. The latitude and longitude values must be in decimal degrees. The altitude must be either feet or meters depending on the AltitudeIsFeet preference setting. The latitude and longitude fields are required and the others are optional. If there is no value for an optional field, the field must still be included (as empty quotes).
Here's an example CSV file:
"35.8129","-86.5462","1456","Radio Tower","Any Description"
"35.8124","-86.5411","1499","Pumping Station",""
"35.8118","-86.5468","1423","Branch Office",""
"35.8113","-86.5457","1467","Checkpoint",""
Here's an example XML file:
<?xml version="1.0" encoding="UTF-8" standalone="yes"?>
<Landmarks>
<Landmark>
<Latitude>35.8129</Latitude>
<Longitude>-86.5462</Longitude>
<Altitude>1456</Altitude>
<Title>Radio Tower</Title>
<Description>Any Description</Description>
</Landmark>
<Landmark>
<Latitude>35.8124</Latitude>
<Longitude>-86.5411</Longitude>
<Altitude>1499</Altitude>
<Title>Pumping Station</Title>
<Description></Description>
</Landmark>
<Landmark>
<Latitude>35.8118</Latitude>
<Longitude>-86.5468</Longitude>
<Altitude>1423</Altitude>
<Title>Brance Office</Title>
<Description></Description>
</Landmark>
<Landmark>
<Latitude>35.8113</Latitude>
<Longitude>-86.5457</Longitude>
<Altitude>1467</Altitude>
<Title>Checkpoint</Title>
<Description></Description>
</Landmark>
</Landmarks>
You can also use landmark files to assign photo directions.
This option strips all of the EXIF and IPTC data from the selected image(s) while preserving only the data that you specify. You can preserve all of the IPTC data, timestamp, latitude, longitude, altitude, direction, title, and/or description. You should normally always preserve the timestamp because without it, an image is of little use to the program. If you want to strip out all of the image meta-data, don't preserve anything.
Once you've loaded some images and have geocoded them, you can use this option to identify images that were taken within X seconds of another and/or identify images that are located within Y meters (or feet) of another.
Specify the time and/or the distance proximity values to identify the images. Once identified, you may want to remove them from the main grid or even delete them from disk. This feature is most useful for those who need to remove redundant images, like those that are clustered around a single point.
The Title Maker allows you to add structure to the image titles and to automatically write them to the image's EXIF. A structured title consists of 3 parts: a beginning, a middle, and an end. You can control the user-interface caption for these parts by specifying the TitleMakerCaption1, TitleMakerCaption2, and TitleMakerCaption3 preference settings. The three parts are combined and delimited (per TitleMakerDelimiter) to form the final image title. When using structured image titles, it's also common to use StampLeftRightJustifiedTitleInMiddle and GeWarnIfEmptyImageTitles.
After you close the Title Maker Form, you'll be prompted whether to write the newly entered data to the EXIF and IPTC headers. Note the writing always occurs on the original images.
|