|
The 1st step is to select the images that you want to use. The 2nd step is to geocode them using any of the available methods.
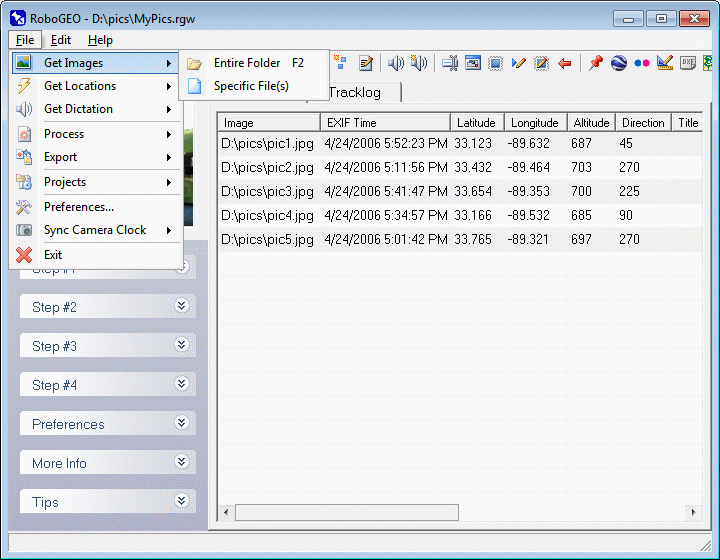
There are 3 ways to select the images that you want to geocode.
1. Select all images in a specific folder.
2. Select one or more image from a specific folder.
3. Dragging and dropping images onto the main grid.
You can select JPG, TIF, BMP, PNG, DNG, NEF, CR2, MRW, ERF, RAF, ORF, PEF, ARW SR2, SRW, RW2, RAW, RWL, and MEF formats. If the image is not an EXIF format (BMP and PNG), you won't be able to geocode it from a GPS tracklog, automatically from a GPX file that contains only waypoints, or from an imported NMEA sentence file. Using any of those methods requires a valid EXIF time stamp which those do not support. You'll have to either manually geocode them or do so from the waypoints in your GPS unit.
When the RotateWhenLoaded preference option is True (the default is False), the orientation of the image is read from the image's EXIF header and, if required, the image is rotated appropriately. The rotation is lossless, permanent, and applied to the original image. The program does not support the rotation of RAW formats such as DNG, NEF, CR2, MRW, ERF, RAF, ORF, PEF, ARW SR2, SRW, RW2, RAW, RWL, and MEF files.
If an image already has a valid time, latitude, longitude, direction, altitude, title or description data in the EXIF headers, that information will be loaded as well. If you want the location data to be obtained from the EXIF GPS destination fields (instead of the normal location fields), set the UseExifGpsDestLocations option to True. If you want the direction data to be obtained from the EXIF GPS bearing field (instead of the normal direction field), set the UseExifGpsBearingDirections option to True.
When exporting to Google Earth, Google Maps, or Shapefiles, you can automatically make use of the image's EXIF and IPTC information.
Some older 3rd party graphic programs don't support the EXIF format, so if you edit your images in those, the EXIF information may be lost. All modern digital cameras create EXIF compliant files.
After an image is loaded, you can perform various operations on it (such as removing it) by double clicking on the filename and then selecting an option from the resulting pop-up menu. You can also multi-select images and perform the same operations via a right-click context menu.
If you've imported or downloaded location data prior to selecting the images and if the images are EXIF format with valid timestamps, they will be automatically geocoded and you'll see the latitude, longitude, altitude, and direction values in the grid. Otherwise, all you'll see in the list is the file name and any existing EXIF data. Not all images will contain all of the information, especially the altitude and direction data.
If you've loaded audio files prior to selecting the images, each image will be associated with the audio file having the closest timestamp. If you want to manually associate the two, you should set the AudioAutoAssociate preference to False before loading either.
Unless you've changed the program option for doing so, your original images will not be affected when processed, i.e. they will first be copied to a folder of your choosing and processed from there.
RAW files (DNG, NEF, CR2, MRW, ERF, RAF, ORF, PEF, ARW SR2, SRW, RW2, RAW, RWL, and MEF) are not supported in Google Earth, Google Maps, or Flickr. If your image list contains any of those, you'll need to convert them to a compatible format (like JPG) before proceeding.
The program does not support the writing of raster data to RAW files, so before stamping, they must be converted to JPG format.
The program fully supports writing EXIF data to all EXIF capable images, including RAW files. Writing to the EXIF is lossless.
If your camera's RAW format isn't supported, you can convert them to DNG using the free Adobe DNG Converter.
You can automate the selection of images by specifying the appropriate command line parameter.
Throughout the program, if you double click on a thumbnail image it'll load in your normal graphics program. You can customize this behavior by setting various program options.
If you're experimenting with the program, a few sample images are provided in the \SampleImages folder.
When you select an entire folder, all JPG, TIF, BMP, PNG, DNG, NEF, CR2, MRW, ERF, RAF, ORF, PEF, ARW SR2, SRW, RW2, RAW, RWL, and MEF files in that folder will be selected. You can quickly choose an entire folder by pressing F2.
The default image folder is always set to the folder that you last selected and is used when the program is automated.
Select this option to select one or more image to add to the list. To select multiple images, click while holding down the Ctrl key.
You can load images by dragging and dropping them onto the main grid. If valid location data exists prior to dropping the files, the images will be automatically geocoded.
|